


- May 2015 (1)
- September 2014 (1)
- August 2014 (5)
- July 2014 (4)
- June 2014 (5)
- May 2014 (3)
- April 2014 (4)
- March 2014 (4)
- February 2014 (4)
- January 2014 (8)
- December 2013 (5)
- November 2013 (5)
- October 2013 (3)
- February 2013 (1)
- March 2012 (1)
- February 2012 (5)
- January 2012 (6)
- April 2011 (1)
- November 2010 (2)
- October 2010 (2)
- August 2010 (2)
- July 2010 (1)
- July 2008 (1)
- November 2007 (1)
- May 2007 (1)
The eBiz BlogIf you enjoy our posts, please share them using the social media options to the left or end of each post. Wednesday, December 04 2013
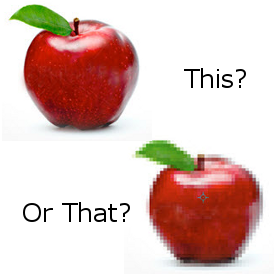
Using Pictures From a Digital Camera Digital cameras are set by default to take pictures primarily for the purpose of printing. When you print out a picture you want it to be bright, colorful, clear, and sharp. So digital cameras are now sold with very high resolutions of 16 megapixels or more. That allows more little pixels per inch and the more there are, the higher quality of picture you will get when printing it. Pictures for use on a website do not need to have the same amount of resolution. A typical picture taken with the default camera resolution setting will be about 4,500 pixels wide by 3,600 pixels high and some will be even larger. The average computer screen is only about 1,400 pixels wide and mobile devices are even smaller. The size of most images used on any website won't be larger than about 400 pixels wide. Having images at the highest resolution from the camera creates a few problems. For starters, the image will be HUGE on your computer screen. You'll be lucky if you can see even 20% of the full size image without scrolling sideways. So before you can even work on it to get it just right for use on your website, you'll need to resize it down ALOT. Some computers won't have enough memory or possibly CPU power to reduce an image from 4000+ pixels down to just 400 pixels. If it does then the odds are it will take a bit of time to complete. If you try and your computer freezes up then the image is just too large for your computer to handle it. The easiest way to combat this problem is to reduce the resolution setting on the camera to something closer to the size of the images that will be needed. If you'll be printing all your pictures then keep the camera at the highest setting. If you're going to use most of your pictures on the web and only occassionally print some then reduce the setting to something like 800 x 600. If all of the pictures you take will be for web use then you can save yourself alot of money and hassle by getting just a 6 - 8 megapixel camera instead of a 14 or 16 MP cameras. Optimizing Digital Pictures for the Web Even if the camera is set to a more reasonable resolution for web photos you will still need to modify them a bit so that they work as efficiently as possible. You want each image to be able to load quickly. One easy way to make that possible is to crop out any parts of the image that aren't needed. Doing that you can easily reduce the file size of the image 20% - 50%. The lower the file size, the faster the image will load. Good image editing software can also compress the image further using tricks like removing redundant colors from the image color palette. Visibly you won't see any difference in the image. Taking out 2 different shades of white or black that are very similar can reduce the file size another 10%- 15%. Retain the Image Quality There are 3 primary image file types for web use. Jpeg (also known as jpg files), gif files, and png files. Gif images will usually have the lowest file size, but that's because the number of colors used in the image are limited. Significantly limited colors produces an image will appear very pixelated. Because of that, the gif file type is best used for graphics where only a few simple colors will be needed. Jpeg images allow for many more colors to be used. That allows for more shading and fine color variations so the image will not be pixalated. Jpeg file optimization and compression can produce a good quality image with a file size that will be larger than a gif file of the same image. However, the increased file size is only about 10% - 20% typically. The major drawback to Jpeg files is that they lose their overall quality the more times the image is saved. For example, if you crop and save the image at a certain size and later decide that the image needs to be larger, change it and save it again, then the newer version will be slightly degraded. You might see some swirly lines in some of the color areas or boundaries between colors won't be as sharp. The image may even get blurry after a few more modifications and saves. Basiclly, any time you have to change a Jpeg file you'll need to go back to the most original version of it and make modifications from there to retain the highest quality image. Png files never lose their quality. You can make change after change and save every variation as needed and there will never be any degradation at all. Png files in most cases are the overall best option to go with. Their only flaw is that they can't always be compressed as much as a Jpeg or gif file, so the file size of the image will typically be larger than if it was saved as a Jpeg. In most cases the larger file size is not significant though. Using Multiple Sizes of the Same Image Applying smaller versions of an image on a site page and linking them to larger version is a good way to save space on a page. But you have to be careful to start with the larger version of the image first and then create the smaller version as a copy from the larger one. That's because doing it in the reverse order will usually produce a poor image. Bigger pictures can be resized smaller and still retain a good overall quality. Smaller images that are made larger tend to stretch the pixels that make up the image and that sometimes produces a fuzzy or blurry effect. So for example, if you are setting up products for your site and are adding thumbnail and detail images of the products then start with the larger product image first. Then resize it down to make the smaller version second. Another method for having multiple sizes is to scale it in the source code of the site page by stipulating a smaller or larger version using a width and height setting that is different than the actual file that was uploaded. This can be a tricky option though because the different width and height setting that is applied needs to match the same proportions as the original file. Otherwise, you end up with an image that appears stretched or squeezed. Scaling is best used if you have an automated program built into your website that can automatically scale images based on the screen size of the device being used to view the site to retain their original proportions. We hope this information helps you to produce the best images for your website. If you have any questions or comments please let us know at support@ebizwebpages.com or use the comments section below. Comments:
|
 Remember the last time you went to a website and it had some really big pictures on it that took forever to load? Or maybe it had some that were too small and when you clicked them to make them bigger they got really blurry? Everybody wants to have pictures of something on their website. Here we are going to cover some of the common errors that occur when adding images to any website and how to avoid them.